106,544 Registered Players
106,544 Registered Players
Midnite Challenge has incorporated true to life, realistic tuning features to enhance your gaming experience. Every effort has been made to make the dyno tuning and track tuning as close to the real world experience as possible. The skills you learn here can easily be adapted and used in real world tuning on your vehicles.
Tuning is essential for any performance oriented vehicle. A properly tuned engine will run stronger and longer. Each time you make a change to your car, like buying a new part, your Air/Fuel Ratio (A/F) will be altered. The idea of dyno tuning, is to optimize your A/F throughout the RPM band so that the engine can produce maximum power at each RPM interval.
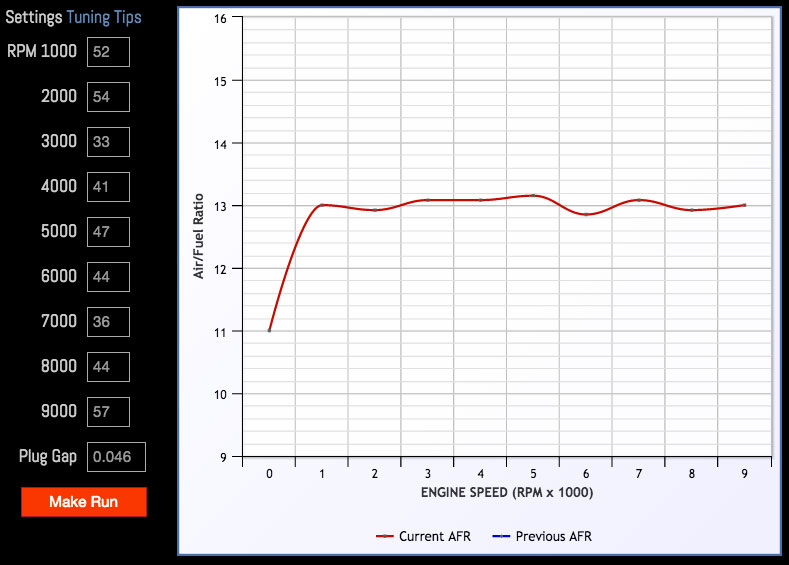
By looking at the chart above, on the left side you can see what your current Fuel Setting is at each RPM interval. Each RPM setting has an 'Target A/F' or ideal A/F Ratio that you must try to match by making 'Runs' on the dyno.
For example, using the same dyno chart above, your current Fuel setting at 6000rpms is 44 and the A/F Ratio as around 12.8. Let's assume your vehicle is naturally aspirated and the target A/F is 13.5 which is where you would be making the most power. Thus, it would be ideal if you leaned out your Fuel Setting at 4000rpms (lower the value), make a run and you will notice that your Power Rating has gone up and your A/F ratio has moved closer to 13.5. If your A/F graph at a specific RPM is above 13.5, then you will need to richen up the fuel (increase the value) at that RPM to lower the graph. Remember, the graph shows how much your current fuel setting is too rich or too lean from the optimal 'target A/F' at each RPM. You will need to increase (richen) or decrease (lean) the fuel settings at each RPM to move the A/F graph as close as possible to the 'target A/F'. Do this for each RPM interval. The problem is that you do not know what the ideal fuel setting is to match the 'target' A/F for each RPM interval, you must increase or decrease the fuel setting at each RPM using trial and error or real world tuning experience to try to match the A/F graph to the target A/F ratio and make maximum power. For a naturally aspirated vehicle, the ideal target A/F is around 13.5 and for a forced induction vehicle the target A/F is around 12.5
Once your A/F is tuned properly, your A/F graph should be flat and right on the target A/F.
Lastly, make finaly tuning adjustments by fine tuning the spark plug gap to achieve slightly better performance. On a naturally aspirated motor, this is generally around 0.030"-0.046" area. However on high compression NA or turbo/supercharged/Nitrous motors, the spark plug gap may need to be closed down to as little as 0.024"-0.032".
Once you have tuned all these parameters, you're vehicle will be making maximum power.
Much like dyno tuning your car to extract the most power from your engine, tuning at the track makes use of the power your motor makes by putting that power to the ground. There is no point in making gobs of power, if you can't put the power to the ground and move the car forward. How is this done? By fine tuning aspects of your vehicle that affect the stability and traction of your car during the launch and the remainder of the quarter mile.
Tire pressure affects the overal contact patch the tire has with the ground. Increasing this contact patch will yield better traction during the launch and give you better 60ft times. Increase the contact patch by lowering the tire pressure on the drive wheels. However, if you lower the pressure too far, it can result in slower ET's as well since your rolling resistance (friction) will be increased and thus for the remainder of the quarter mile, you will be slower - even though your 60ft time has been reduced. Generally, you want to increase the contact patch on the drive wheels by lowering the tire pressure, and increase the tire pressure in your non-drive wheels to reduce rolling resistance.
Dampers play a huge part in the initial 60 feet of the track. They help the stability of the car by maintaining front-to-rear vehicle weight distribution and keeping the drive wheels in contact with the ground. On a front wheel drive car, you generally want to eliminate any 'sqwat' effect by making the rear of the car pretty stiff, and the front of the car relatively soft. This will help keep the car from squatting when you launch. The reverse holds true on a RWD car.
Camber on the front wheels play a minor roll, however setting the camber correctly especially on a FWD car is essential to proper contact patch on the drive wheels. Camber is the angle of the wheel when viewed from the front or rear of the car - how far from perpendicular the wheel is relative to the ground.
Your timeslip tells you how well your car runs at each interval. The quarter mile is 1320ft and on the timeslip, is broken down into smaller timed segments - 60ft, 300ft, 1/8th mile, 1000ft, 1320ft - with trap speeds given at the 1/8th mile mark and at the end of the 1320.
R/T shows your Reaction Time in accordance to the 'tree'. How fast you leave the line from when the lights go green, is your R/T. The more experience you have and the higher you skill level, the lower your R/T will be. Keep in mind though, that R/T is not calculated into your overal quarter mile time.
A very important area to focus on is your 60ft time. Lowering your 60ft time, yields drastic results in your overal quarter mile time. Generally, for every 0.10 second you can reduce your 60ft time, translates to a 0.20 second improvement in your overall quarter mile time. As you can see, the better you can launch your car, the better your quarter mile time will be. This is directly related to how well you've tuned your car at the track and how high your experience and skill level are. Of course, the 60ft time is also dramatically affected by what type of drivetrain you have. The worst drivetrain is the FWD car since upon lauching, the vehicle will tend to squat and shift the weight of the car to the rear wheels, thus reducing traction on the front drive wheels. RWD and AWD (All-wheel drive) vehicles far out perform any FWD vehicle.
When racing someone, you can compare who well you did against your opponent by examining the times and MPH at each interval along the quarter mile. If a car should break down during the race, a DNF will be displayed under their column.
Keep in mind that even though you may have run the faster quarter mile time, you may still end up losing the race if your reaction time is slow compared to your opponent. The winner is the driver with the fastest reaction time PLUS their overal quarter mile time.
© Copyright 2024 Kaos Logic All Rights Reserved Terms of Use Privacy Policy FAQ